
2 min read
What is Google Search Generative Experience? (SGE)
What is Google SGE? Think of Google SGE as your helpful buddy on the search results page. Instead of making you click on different websites, it pulls...
4 min read
Fuzzy Lookup is a great tool for several different scenarios in search marketing, with one of its most common use cases being for site migrations.
At Honcho we work on Macs fairly exclusively which is a problem as Excel for Mac doesn’t support Fuzzy Lookup in the same way it’s available on Windows. An alternative is to use an addon within Google Sheets, however, that comes with limitations and a premium subscription. Which hardly seems fair as it’s free on windows.
Using the Fuzzy Wuzzy Python package and either Jypter Notebook (other IDE’s are available) or Google Sheets and Google Collab we can use Fuzzy Lookup on Mac, for free.
In the first part of the article, we’ll go through how we can use it with VSC on your machine and in the second, how we can add this to Google Drive so it can be used on multiple machines without any sort of set-up.
I’m going to assume you already have Python on your machine and you have a new file ready. At the most basic level, we can use 2 strings to compare the match, seen below.

from fuzzywuzzy import fuzz
Str1 = "Apple Inc."
Str2 = "Granny Smiths Apple"
Ratio = fuzz.ratio(Str1,Str2)
print(Ratio)
Next is how we can use 2 lists to lookup List 1 vs List 2, finding the closest match for a single variable in List 1, against the variables in List 2.
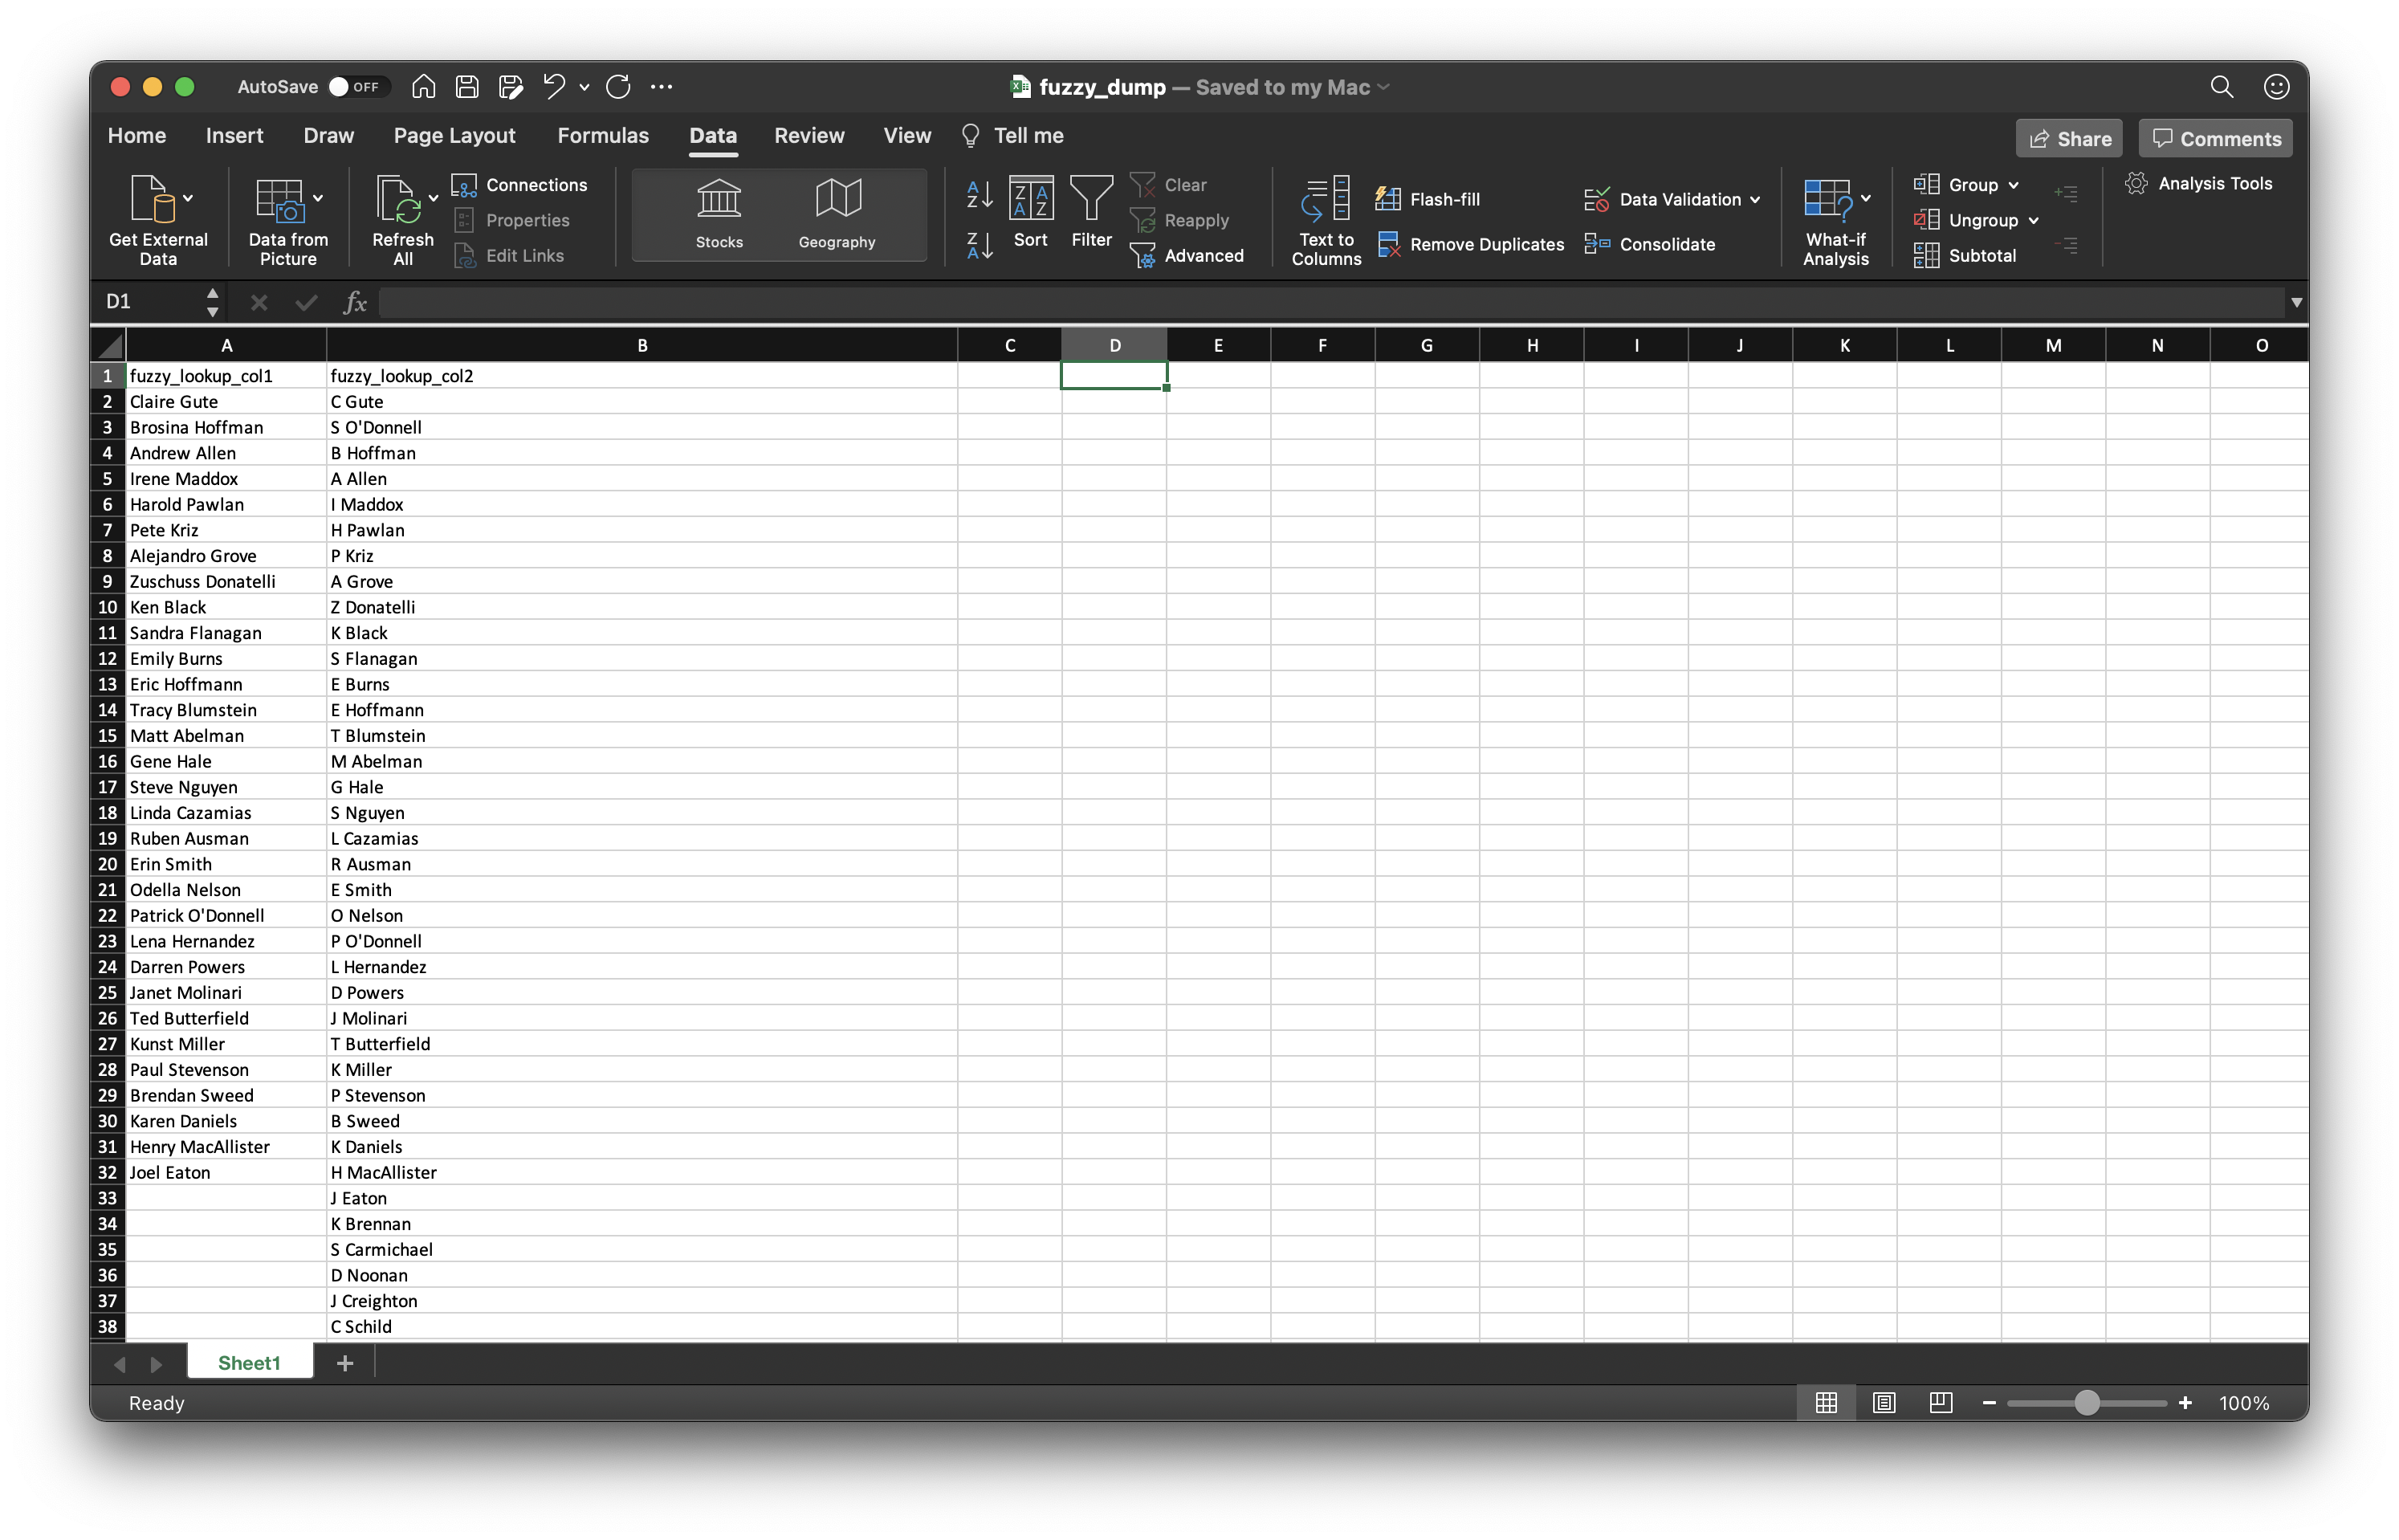
In my example below I have used an Excel (.xlsx) document with 2 columns. When creating your own you may need to change the 2 points below to reflect what you have in your reference documents.
IMPORTANT: My Document is named “fuzzy_dump.xlsx” and is referenced in the code, your document name will need to change to your naming convention.
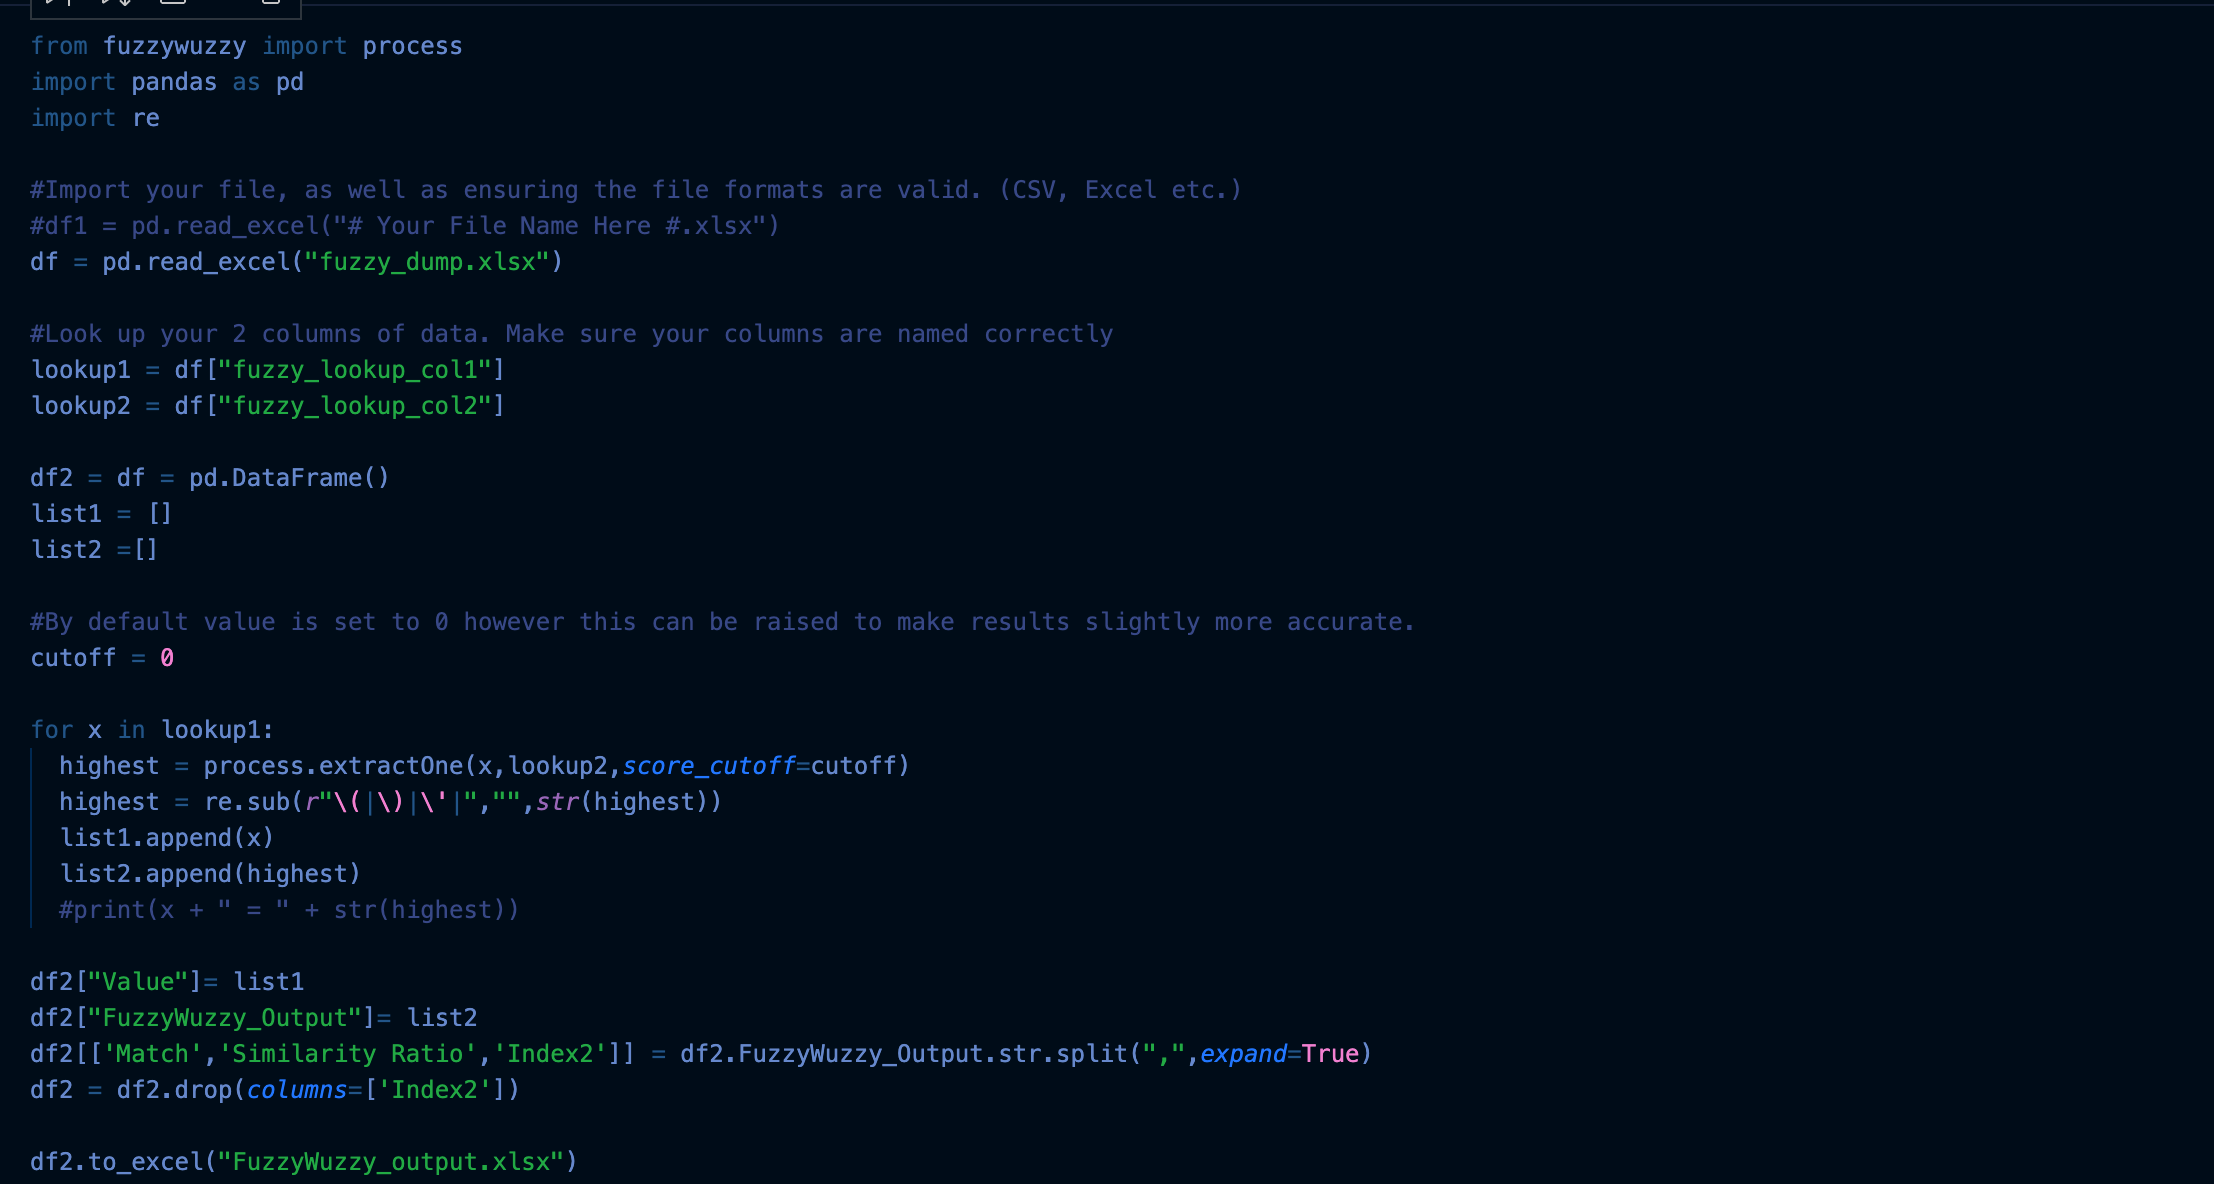
from fuzzywuzzy import process
import pandas as pd
import re

#Import your file, as wel as ensuring the file formats are valid. (CSV, Excel etc.)
#df1 = pd.read_excel("# Your File Name Here #.xlsx")
df = pd.read_excel("fuzzy_dump.xlsx")

#Look up your 2 columns of data.
#Make sure your columns are named correctly
lookup1 = df["fuzzy_lookup_col1"]
lookup2 = df["fuzzy_lookup_col2"]

df2 = df = pd.DataFrame()
list1 = []
list2 =[]

#By default value is set to 0 however this can
#be raised to make results slightly more accurate.
cutoff = 0

lookup1 = lookup1.dropna()

for x in lookup1:
  highest = process.extractOne(x,lookup2,score_cutoff=cutoff)
  highest = re.sub(r"\(|\)|\'|","",str(highest))
  list1.append(x)
  list2.append(highest)
  #print(x + " = " + str(highest))

df2["Value"]= list1
df2["FuzzyWuzzy_Output"]= list2
df2[['Match','Similarity Ratio','Index2']] = df2.FuzzyWuzzy_Output.str.split(",",expand=True)
df2 = df2.drop(columns=['Index2'])

df2.to_excel("FuzzyWuzzy_output.xlsx")
The above script will output a new excel file named “FuzzyWuzzy_output.xlsx” in the same directory as your script
This is going to be very similar to the Google Trends Collab method we’ve done previously.
Few things we’ll need before starting this section of the project:
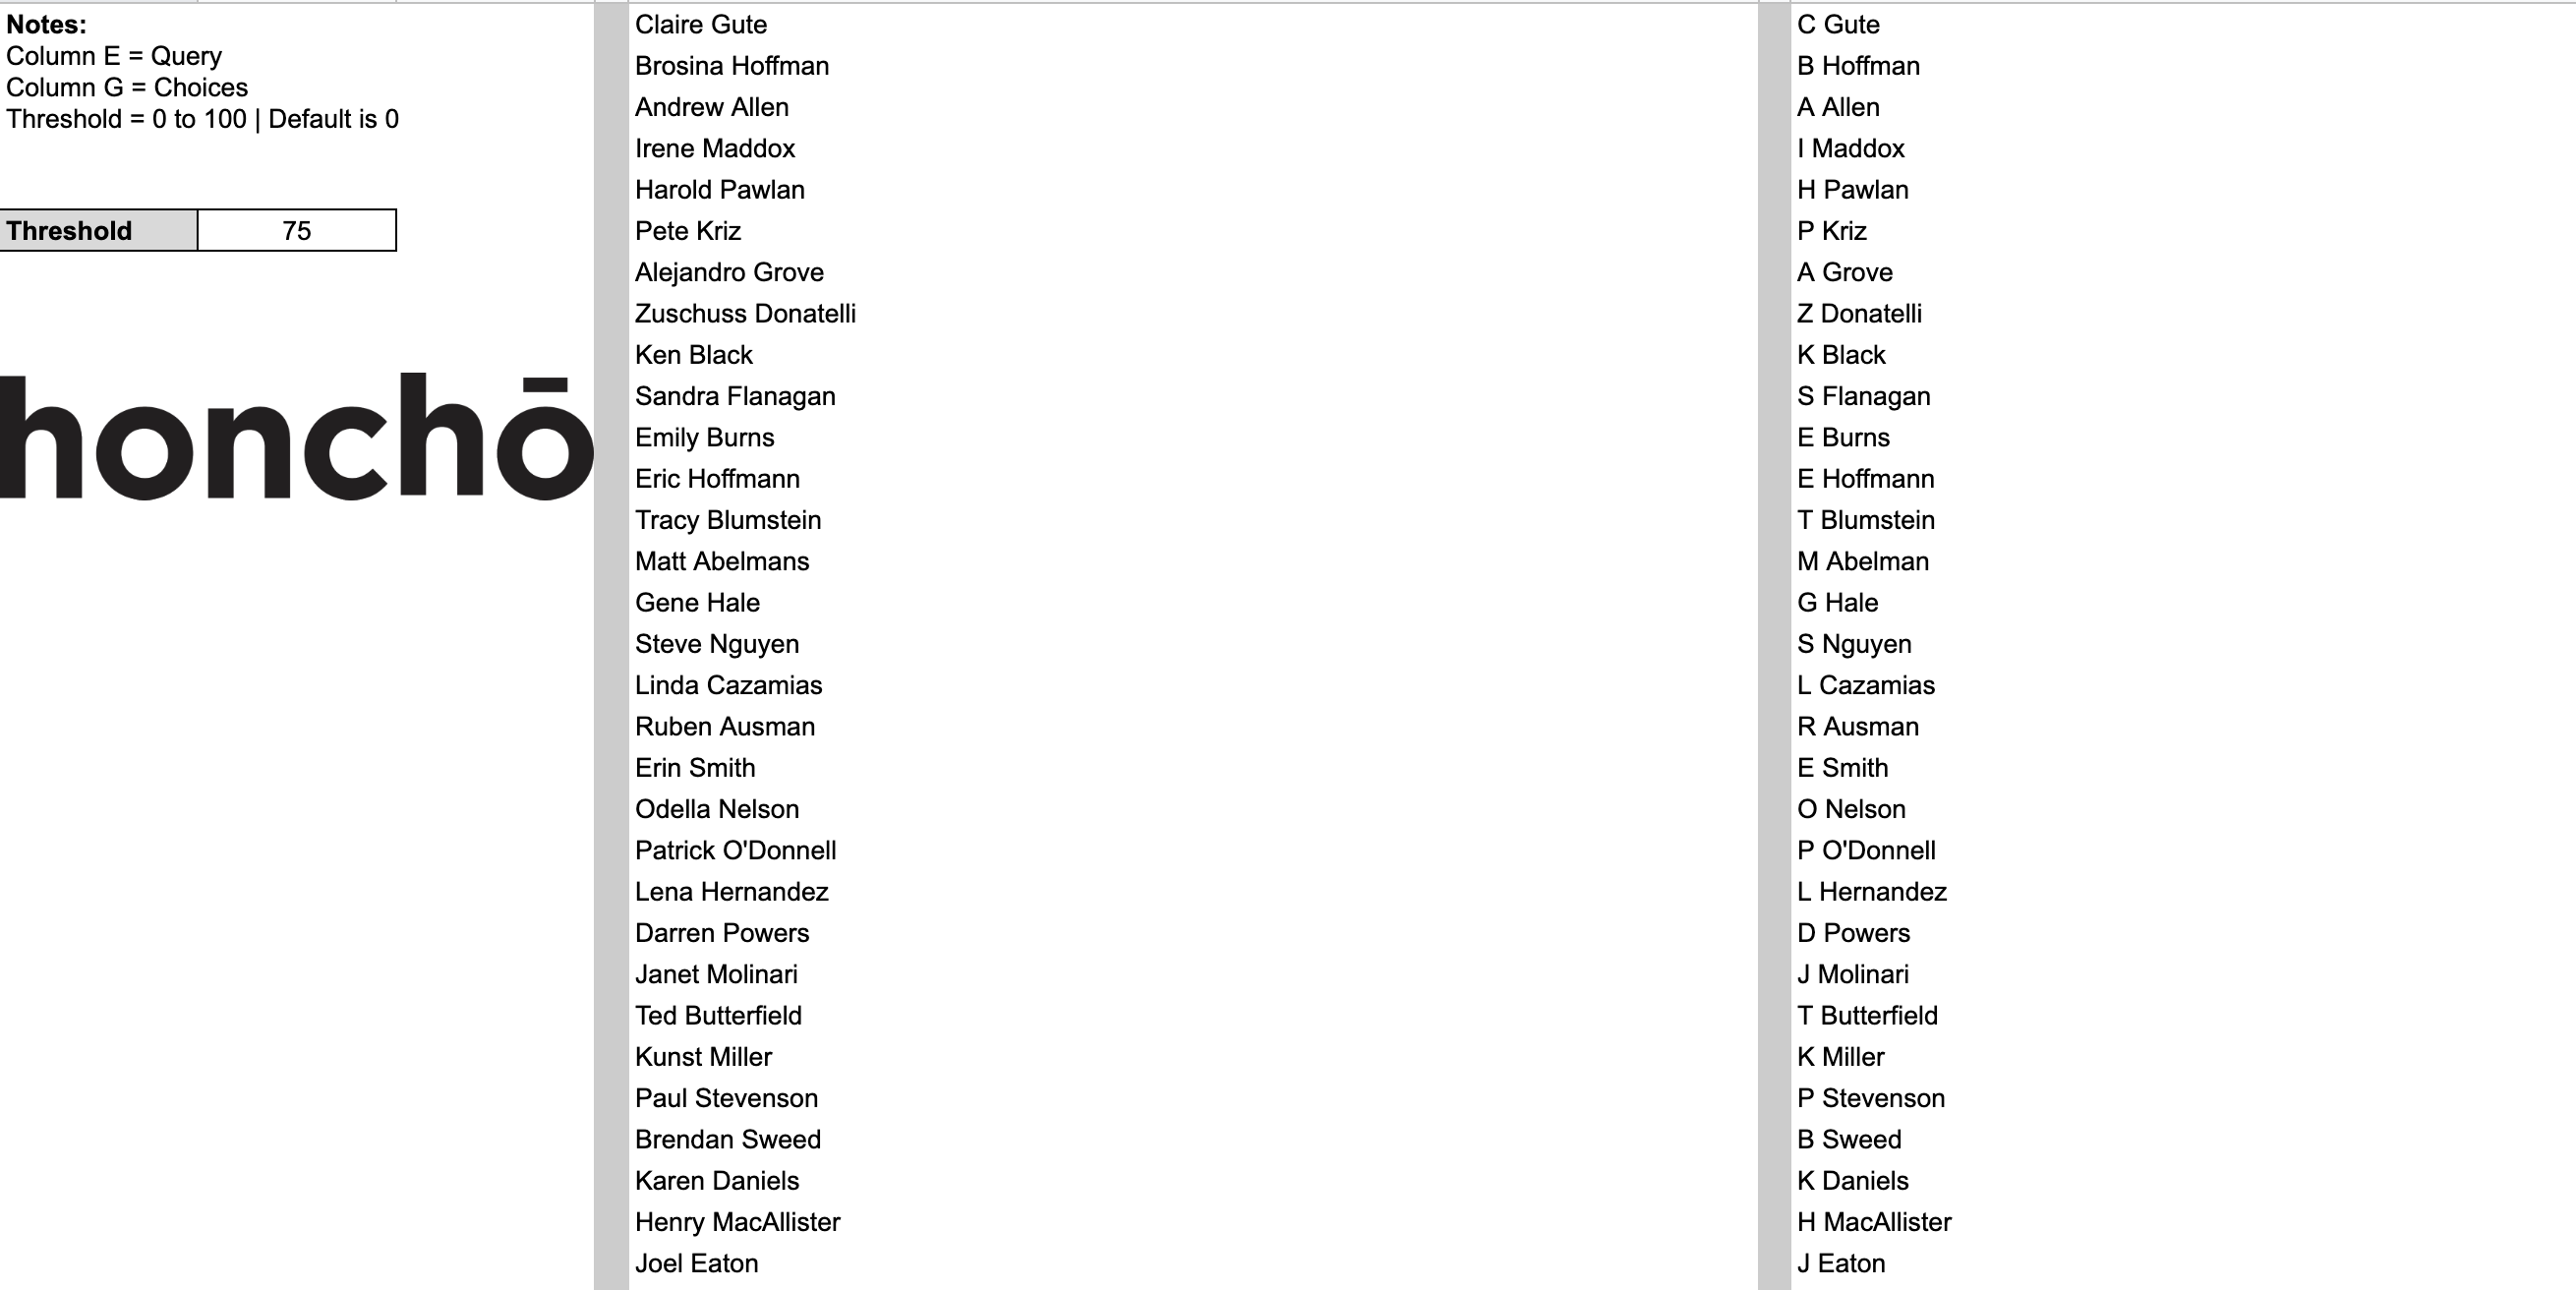
Using the link below, view and copy our Google Drive Sheet. This controls the input and the scoring parameters.
Feel free to create your own data input, we go over all the referencing later on which can be used to edit and play around with fields. The most important thing to note is the lookup and reference columns are in the correct order.
In the below doc, we have..
Link to our sheet: Google Sheet
In your file with your keyword input, right-click and select More > Google Collaboratory . If you don’t see it, select “connect to more apps” and search for Colaboratory and install.
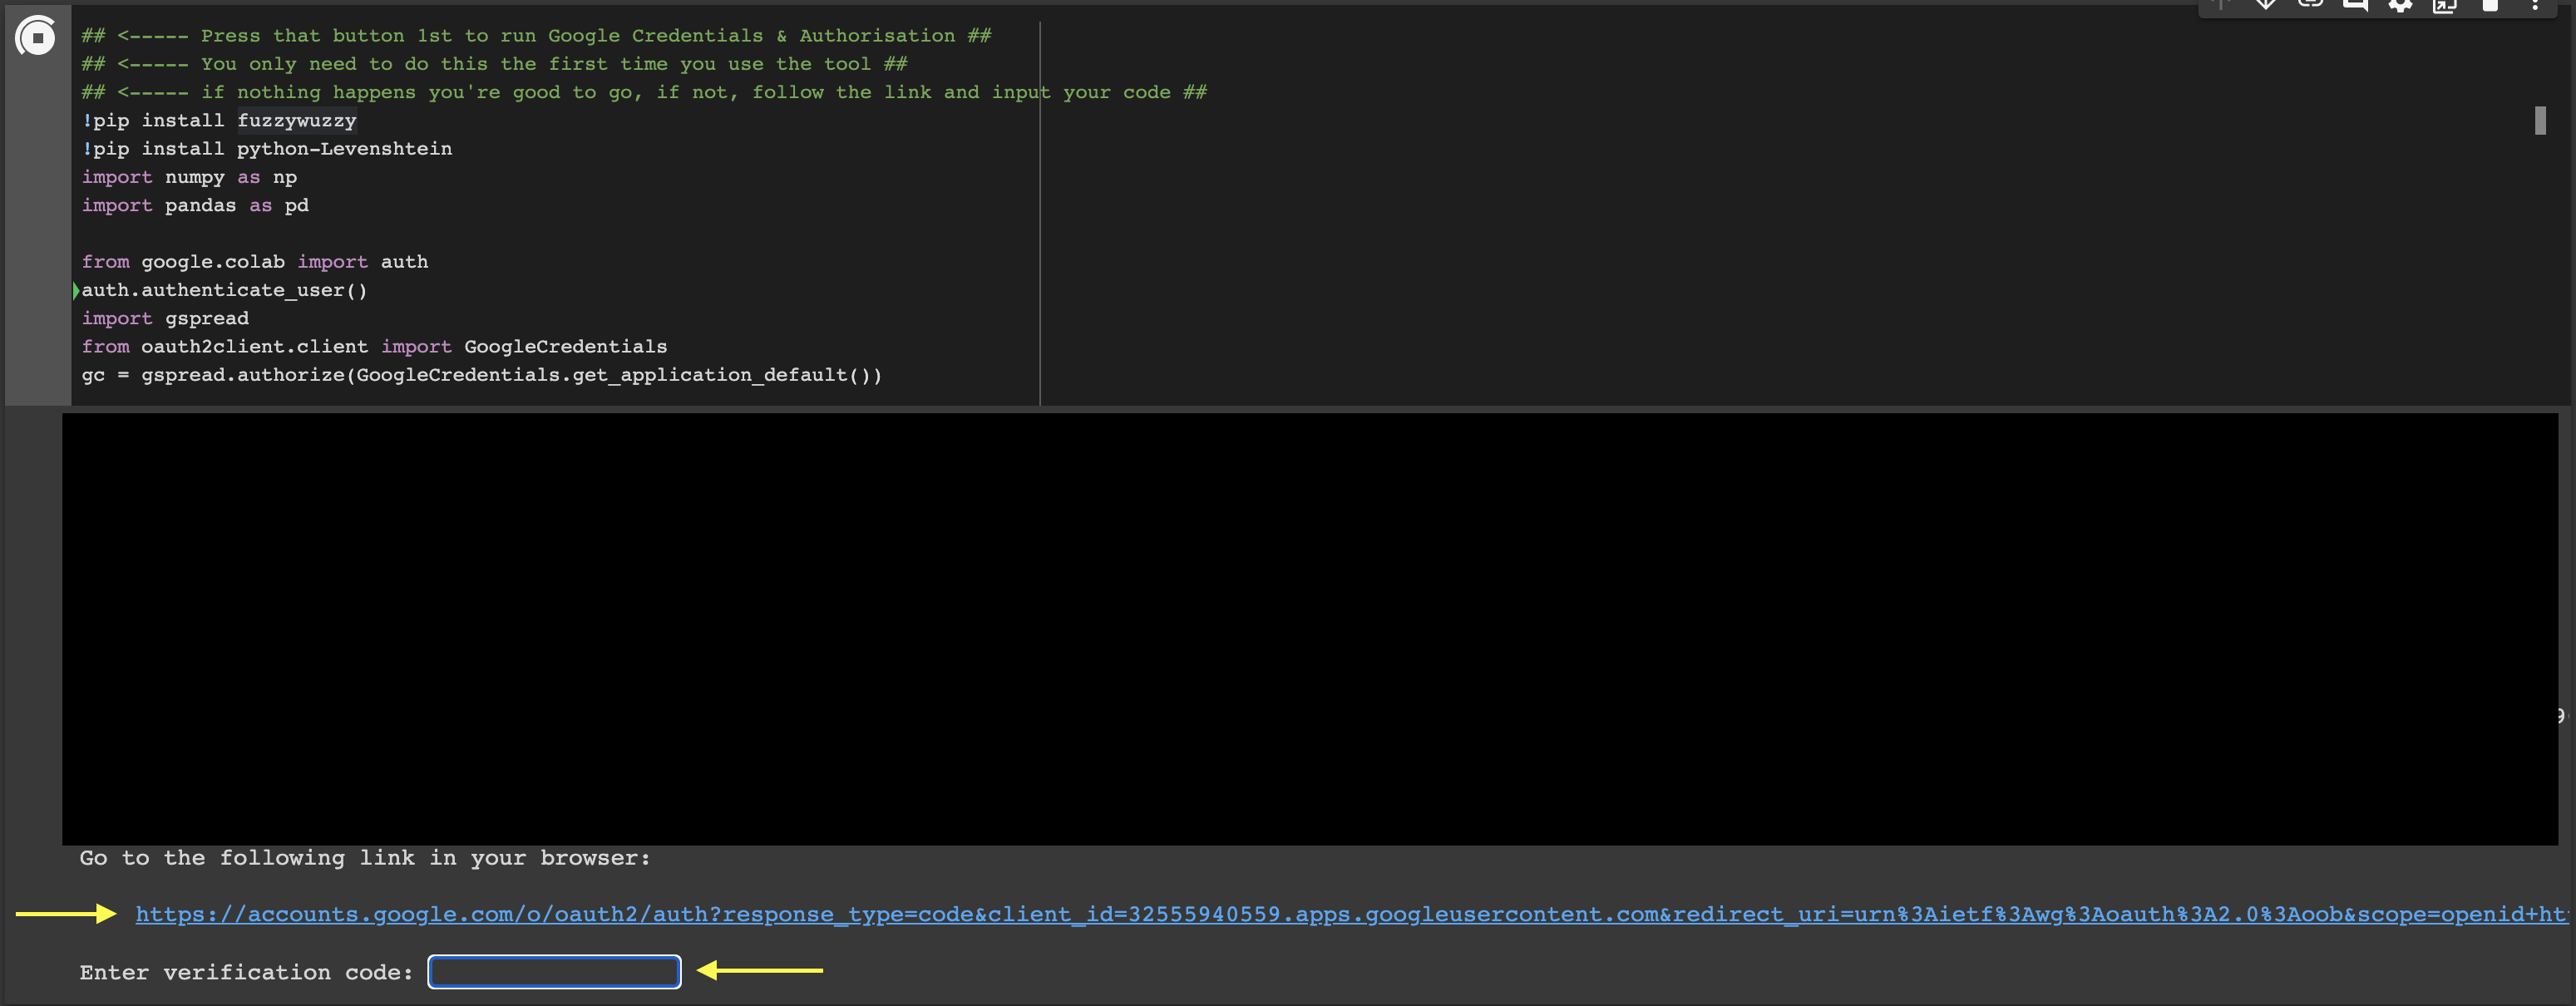
Within your Colab file we’re going to create 2 code cells, the first which verifies your Google Account giving you access to drive and allowing our input file to control our script, and then the second cell is our script.
google-auth is the Google authentication library for Python and what we’re using to verify our account. Copy the code below into your first code cell
    ## <- Press that button 1st to run Google Credentials & Authorisation ##
    ## <- You only need to do this the first time you use the tool ##
    ## <- if nothing happens you're good to go,
    ## if not, follow the link and input your code ##
    !pip install fuzzywuzzy
    !pip install python-Levenshtein
    import numpy as np
    import pandas as pd

    from google.colab import auth
    auth.authenticate_user()
    import gspread
    from oauth2client.client import GoogleCredentials
    gc = gspread.authorize(GoogleCredentials.get_application_default())
Our aim when moving this to Google drive is to make it accessible. So in our case for all of our staff, some of who aren’t familiar with an IDE. In our code cell 1, we’ve added comments, to direct users and help them through the process.
Create a new code cell and copy and paste the below:
    df = wb = gc.open_by_url('### Enter your input file share URL ###')

    #Sheet control references
    sheet = wb.sheet1
    query = sheet.col_values(5)
    choices = sheet.col_values(7)
    threshold = sheet.acell('B6').value

    df2 = df = pd.DataFrame()
    list1 = []
    list2 = []

    from fuzzywuzzy import process

    for x in query:
      highest = process.extractOne(x,choices,score_cutoff=float(threshold))
      highest = re.sub(r"\(|\)|\'|","",str(highest))
      list1.append(x)
      list2.append(highest)

    df2["Value"]= list1
    df2["FuzzyWuzzy_Output"]= list2
    df2[['Match','Similarity Ratio']] = df2.FuzzyWuzzy_Output.str.split(",",expand=True)

    df2.to_csv('Fuzzy_Lookup_DOWNLOAD_ME.csv')
    !cp Fuzzy_Lookup_DOWNLOAD_ME.csv "### Enter your file path to save your CSV ###"
To link your input Google Sheet we need to copy the shareable URL and paste it into line 10. This can be done via the green share button (top right) on the Google sheet.
    df = wb = gc.open_by_url('### Enter your input file share URL ###')
    #Change to....
    df = wb = gc.open_by_url('https://docs.google.com/spreadsheets/d/1dQHzIB...')
To output our file we need to give the script a file path. The easiest way to do this is to Mount Google Drive in Google colab, navigate to your directory and "Copy path".
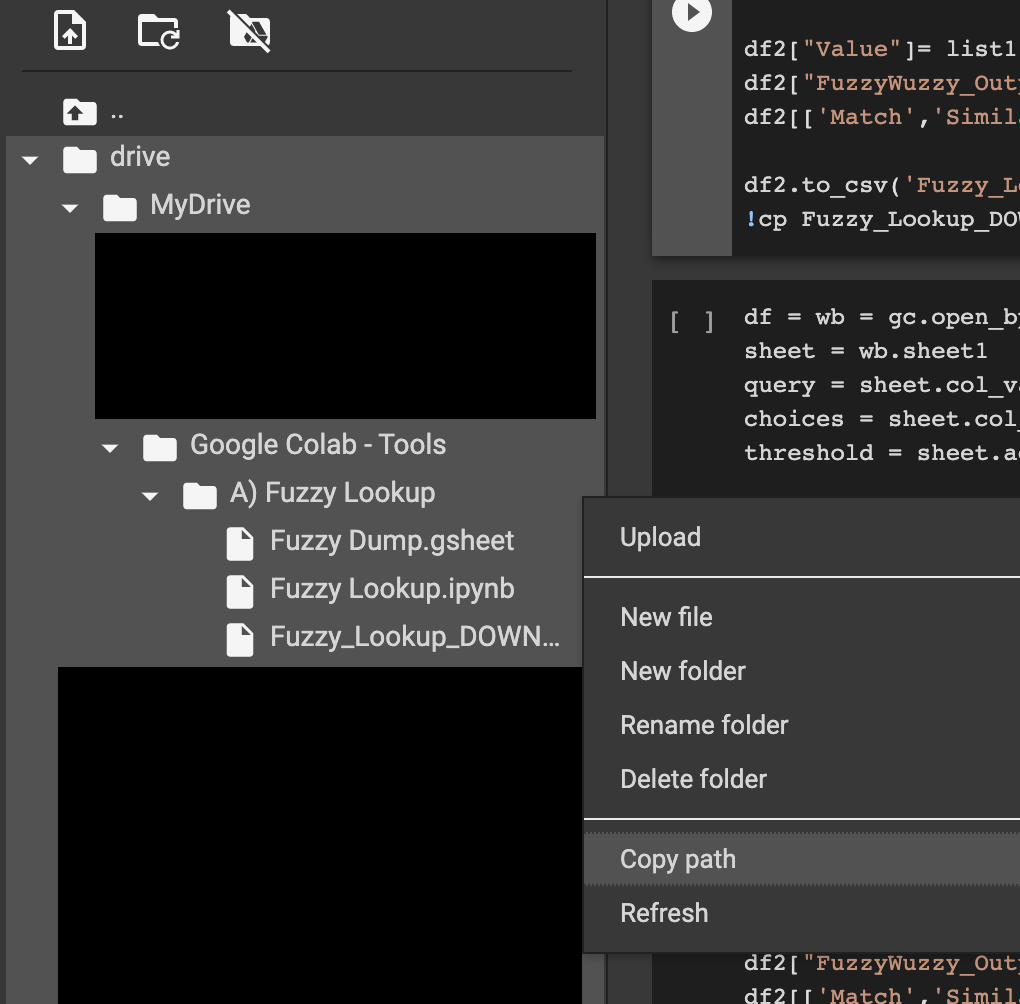
If your directory by default is higher in the file structure than your Google Drive folder, your drive files can be found in Content > Drive > My Drive.
!cp Fuzzy_Lookup_DOWNLOAD_ME.csv "### Enter your Google Drive path ###"
#Change to....
!cp Fuzzy_Lookup_DOWNLOAD_ME.csv "/content/drive/MyDrive/Google Colab - Tools/A) Fuzzy Lookup"
Test your script, this should now create a downloadable CSV file with all your data. I'd recommend users download or copy files to another drive, as this keeps the directory clean. Opening the CSV file within Google drive will create a Google sheets version.
If that all works, you are done 👍
Fuzzy Lookup is a great tool, for all digital marketers and anyone working with data. Hopefully you've found this useful. Any questions drop us an email or DM on any of our social channels.
Read more about the automating Google Search Trends or Scraping Reddit with Python


2 min read
What is Google SGE? Think of Google SGE as your helpful buddy on the search results page. Instead of making you click on different websites, it pulls...

5 min read
Discover the power of high search volume keywords and how to effectively use them to boost your online presence and drive maximum impact.

2 min read
We're delighted to officially announce our partnership with Eflorist, one of the world’s leading flower delivery brands with over 54,000 local flower...
In this article we’ll look at how we built a script in Python 3, using Pytrends to effectively automate data collection from Google Trends. Also...
Making it easy to download a file from Colab Google Colab or “Colaboratory” is a product from Google research. Colab allows users to write and...
2 min read
I’ve been a fan of Foursquare for some time and with the recent changes it doesn’t look like things are going to change! This week, Foursquare...